Part 3 · Identity & Access Console
Access Console Deep Dive
The access console is where reps actually spend their day: browsing Jump Items, launching sessions, and managing everything that's currently in progress. This module walks through how it authenticates against the appliance, the layout of its panels, and how session control ties back to what an admin can see and do from /login.
What the access console is, and isn't
As Module 1 established, the access console is not PRA itself — it's the desktop client reps use to consume whatever permissions the appliance hands them. It's installed per user, not per machine: an admin downloads it from /login > My Account, where the download page automatically offers the right installer for the signed-in user's operating system. During installation you can choose Run BeyondTrust Access Console Now and/or Run at Startup. On Windows, the installed shortcut lives under Start Menu > All Programs > BeyondTrust > <your-site-hostname> — a naming convention worth knowing, since a rep with access to multiple sites ends up with multiple, separately named console shortcuts.
How the console authenticates against the appliance
Every time the console opens, it needs to establish who's using it before anything else happens. Several mechanisms can be in play, layered on top of each other depending on how the site is configured:
- Username and password is the baseline. If a Login Agreement is enabled for the site, the user must click Accept before the credential prompt even appears.
- Two-factor authentication, if enabled on the account, adds a code from an authenticator app after the password is accepted.
- Passwordless login using a FIDO2-certified authenticator (up to 10 per user) can replace the password entirely once registered at /login > My Account > Security, with admins managing registrations site-wide at Users & Security > Users > Passwordless Authenticators. On macOS and Linux, only roaming authenticators like hardware security keys are supported for the desktop console — platform authenticators such as Face ID or a laptop fingerprint reader are not.
- Kerberos single sign-on, if configured, skips the credential prompt entirely. The console remembers whichever mechanism was used last — local credentials, Kerberos, or another security provider — and offers that first next time.
- Enable Saved Logins lets the console remember a username and password locally; this convenience option can itself be disabled site-wide from
/login > Management > Security.
Once authenticated, the console shows a BeyondTrust icon in the system tray and stays connected. If the network drops, it retries reconnecting for 60 seconds before prompting the user to retry or quit; if the connection comes back within that window, every open session is restored automatically. Signing in from a second location doesn't automatically kill the first — both stay open — unless the site has Terminate Session If Account Is In Use checked on /login > Management > Security, which forces the older session closed when a new one starts.
Walkthrough: session control from both sides
Lab 04 demonstrates something worth internalizing early: an admin can forcibly end a rep's console session from /login, and the rep sees it happen in real time. Under Status > Users, every currently logged-in console session is listed with its username, display name, whether it's actively in a session, and how long it's been logged in.
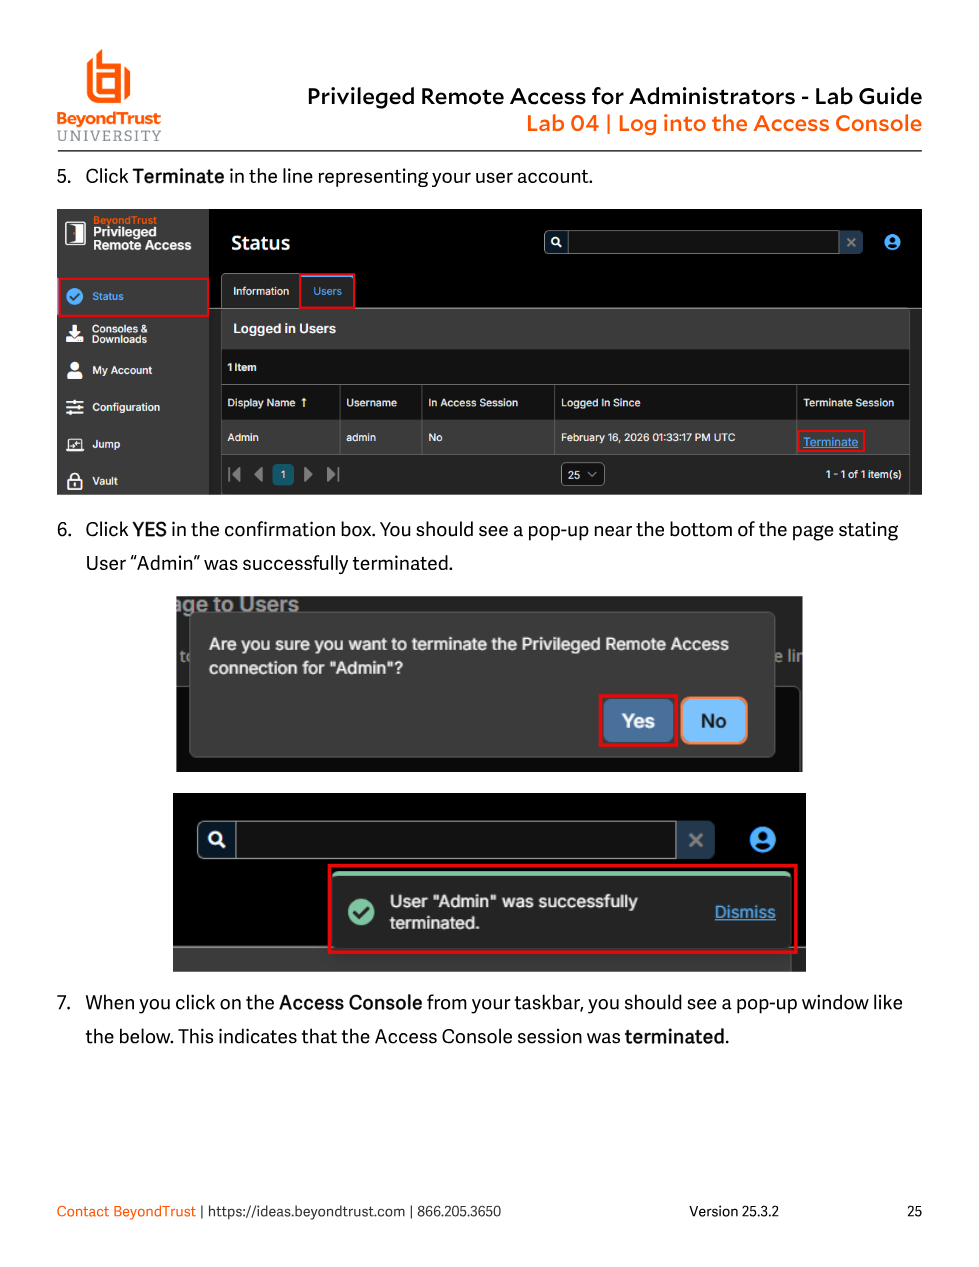
/login > Status > Users. A confirmation prompt ("Are you sure you want to terminate the Privileged Remote Access connection for...") guards the action, and a success toast confirms it.The moment that termination is confirmed, the corresponding access console pops a dialog reading "Your session has been terminated" — the rep has to click OK and sign back in before doing anything else. This is the practical, hands-on version of what Module 9 discussed abstractly: the appliance is always the authority, and the console just reflects whatever state the appliance decides is current.
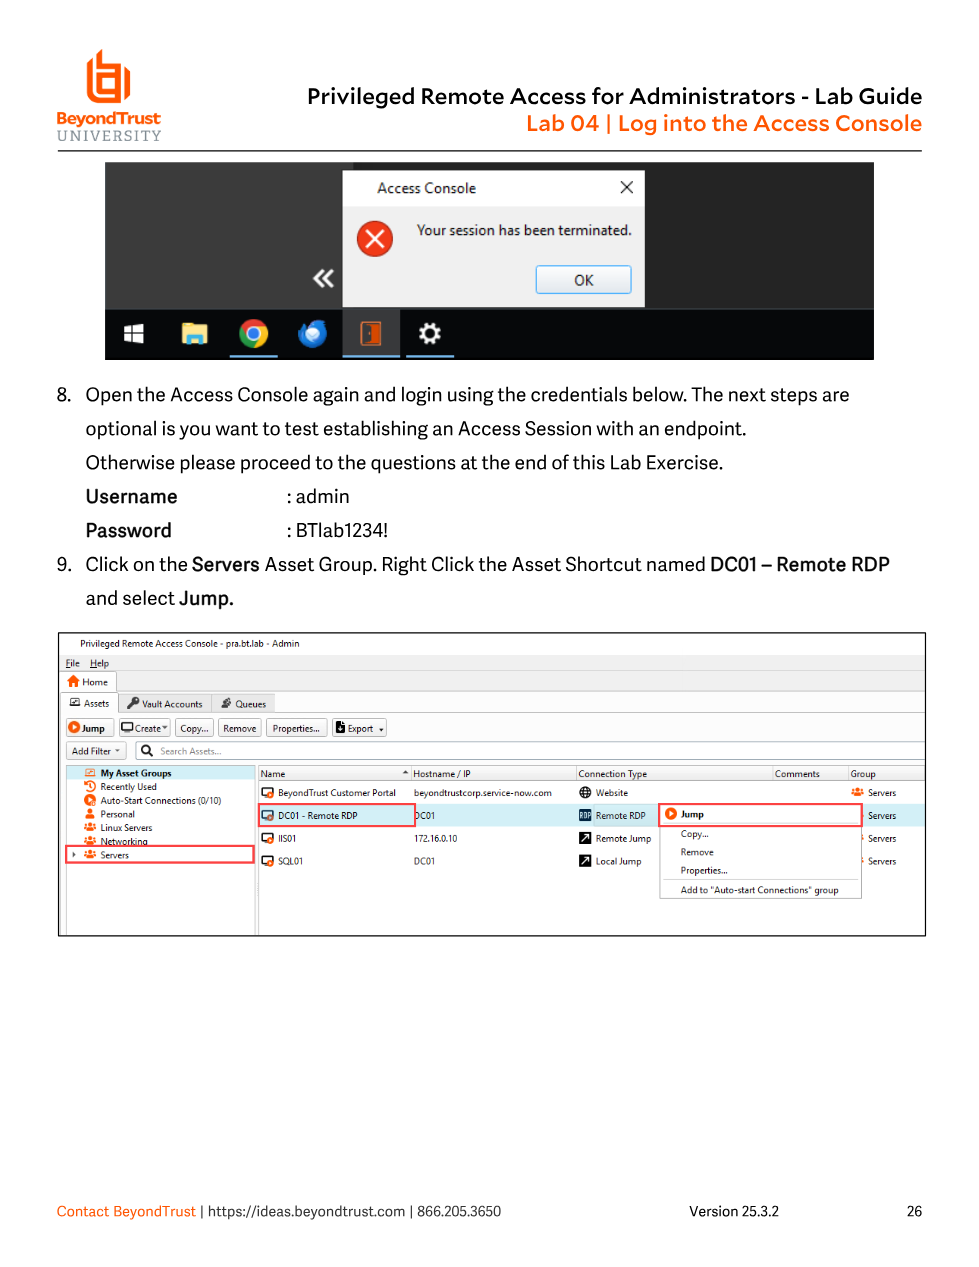
That Assets grid is the console's Jump Item browser: a table of every Asset the signed-in user can reach, with columns for Name, Hostname / IP, Connection Type (Website, Remote RDP, Remote Jump, Local Jump, and so on), Comments, and Group. The left-hand tree groups Assets the same way Asset Groups are organized in /login (Module 11), plus two dynamic groups the console maintains for you — Recently Used and Auto-Start Connections — and a Personal node for Assets the user has pinned just for themselves. Double-clicking an Asset, or right-clicking it and choosing Jump, is how a session actually starts; which connection types appear as options depends on both the Asset's configured type and the user's Allowed Asset methods permission covered in Module 9.
The rest of the console layout
Beyond the Assets tab, the console is organized into a handful of other panels reachable from the top toolbar:
- Sessions — the working area for every session currently open, letting a rep run several at once, each as its own tab (or detached window, depending on settings).
- Queues — lists sessions in progress and pending share requests across the team, with columns for how the session started, its owner, total elapsed time, the target computer's hostname/OS/uptime, an external key (useful for correlating with an outside ticketing system), and the Vault credential attached to it, if any.
- Dashboard — gives privileged users a monitoring view of sessions and team members with an equal or lower role, which is how a supervisor keeps an eye on what the team is doing without joining every session.
- Chat — messaging with other logged-in users, including the ability to share your own screen with a teammate without opening a formal session.
Console settings and how much a rep can actually change
Reps configure their own preferences from File > Settings: chat spellcheck, light/dark display mode, alert sounds, whether sessions open as tabs or detached windows, default screen-sharing quality, RDP display size, file-transfer and screenshot directories, shell history length and default shell order, and the order external tools appear in when opening a session. Any of these an administrator has locked down site-wide appears grayed out with an asterisk and simply can't be changed locally — a quick visual tell for "is this a user preference or an enforced policy." A Restore Defaults button resets everything back to either the BeyondTrust defaults or whatever defaults the administrator has enforced.
Power users can also install a CLI tool from the Global Settings panel — if an admin has enabled Allow the Access Console CLI Tool under /login > Management > Security — which lets them start sessions like bt ssh user@host or bt rdp user@host straight from a terminal instead of clicking through the Assets grid.
New reps sometimes assume closing the console window ends their session cleanly, the way closing a browser tab would. It doesn't always — and conversely, an admin-initiated termination from /login > Status > Users (as in Lab 04) is immediate and unannounced beyond the pop-up dialog. If a rep reports the console "just kicked them out," the first thing to check isn't their laptop — it's whether an admin terminated their connection, whether Terminate Session If Account Is In Use fired because they're logged in elsewhere, or whether a network restriction on /login > Management > Security is blocking reconnection from their current network.