Part 4 · Assets & Jump Technology
Asset Groups
Every Jump Item you'll create in this Part — RDP endpoints, Shell servers, protocol tunnels, websites — has to live somewhere. Asset Groups are that "somewhere": the organizational container that determines who can even see an asset before Asset Policies and Asset Roles decide what they can do with it.
What an Asset Group is
An Asset Group is a folder-like container for Assets (Jump Items) that also carries its own access-control list. In the Asset Management interface, every Jump Item you create — an RDP endpoint, a Shell server, a Protocol Tunnel, a Website — must be assigned to exactly one Asset Group. The group is not cosmetic: it is the first and broadest gate a user has to pass through before they can even see an asset in their Access Console, let alone jump to it.
Conceptually, Asset Groups answer one question: who is allowed to know this asset exists? Everything downstream — Asset Policies (Module 12, governing schedule and approval) and Asset Roles (Module 13, governing permitted actions) — only comes into play after a user has group-level visibility. Get the grouping wrong and no amount of policy or role tuning downstream will fix it, because the asset was never visible to begin with.
Why grouping matters for permissions
BeyondTrust's own guidance frames it plainly: Asset Groups "enhance security and efficiency by organizing Assets and controlling access to them," letting administrators "assign specific permissions to team members, ensuring appropriate access to remote systems while maintaining compliance and safeguarding sensitive data." In practice this means you design Asset Groups around who should have access to what class of system, not around convenience or geography alone. A small environment might group by function — Windows Servers, Linux Servers, Networking, Databases, Web Consoles — so that granting the Network team an Asset Role in "Networking" doesn't accidentally hand them Domain Controllers too.
Users and Group Policies (Module 18) are assigned to Asset Groups from two places: the Asset Groups tab itself, or the Users & Security > Group Policies page. When you add a member to a group, you also choose their Role for assets in that group (an Asset Role, or "User's default" to inherit whatever role is set on their user account or group policy) and, optionally, an Asset Policy that governs schedule/approval for that membership. This is the seam where the three Module 11–13 concepts connect: Asset Group (visibility) → Asset Role (permissions) → Asset Policy (when/with what approval).
Because Asset Group membership drives visibility, it's the cheapest and most effective lever for least privilege. A rep who was never granted a role in the "Databases" Asset Group never sees the SQL servers in their Access Console at all — there's no policy to misconfigure, no role to over-scope, because the asset simply isn't in their tree.
Finding the Asset Groups page
Asset Groups live under Asset Management > Asset Groups in the /login administrative interface, alongside the Jump Clients, Asset Policies, Asset Roles, Gateway, Assets, and Endpoint Automation tabs. The list view shows three columns: Name (the unique display name), Code Name (an integration-friendly identifier, auto-generated if you leave it blank), and Comments (a free-text description of the group's purpose).
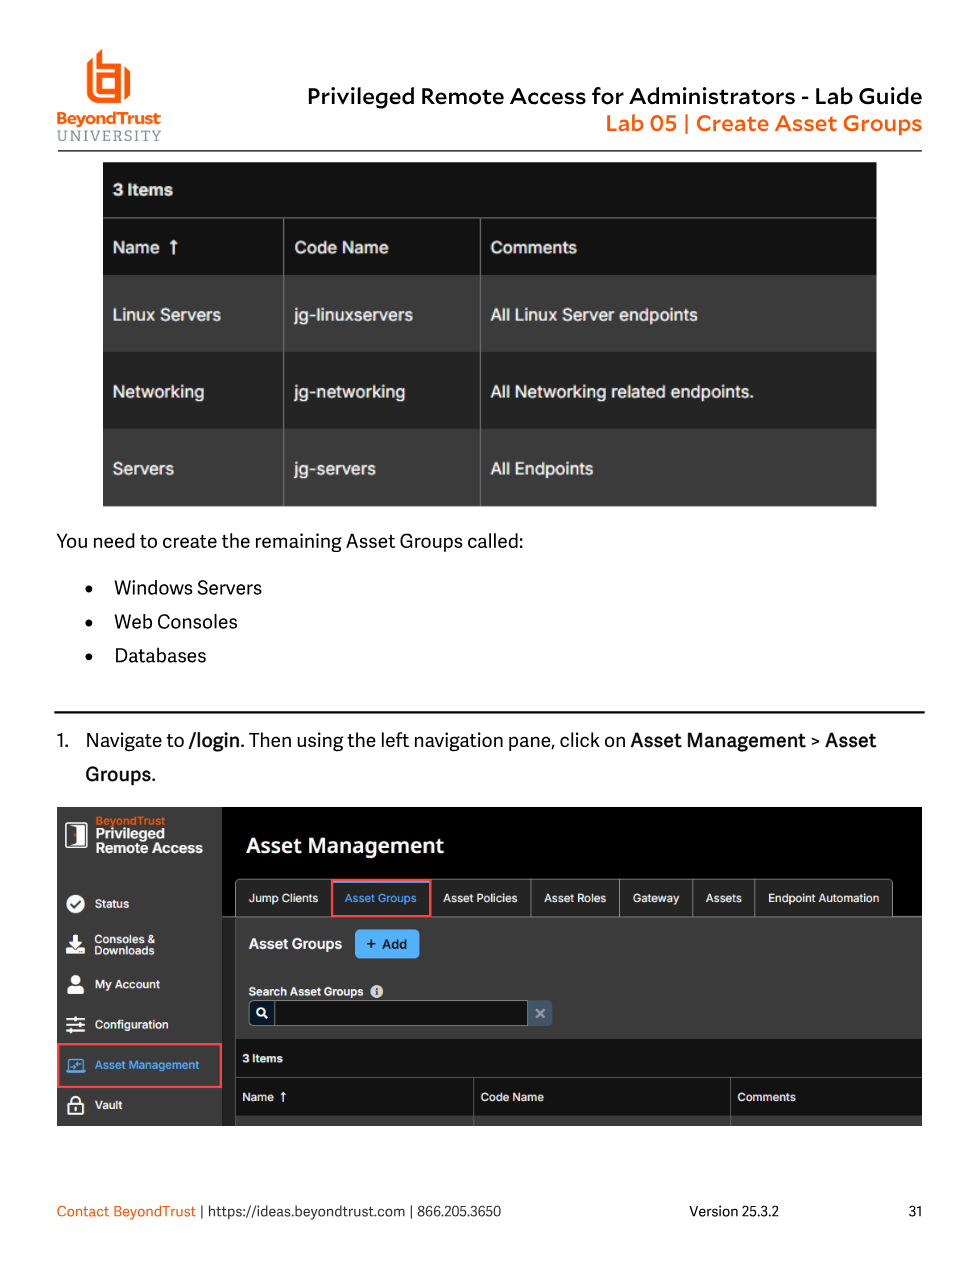
/login. The starting environment ships with three groups (Linux Servers, Networking, Servers) that the lab expands.Walkthrough: creating an Asset Group
Lab 05 has you build out a fuller set of groups (Windows Servers, Web Consoles, Databases) alongside the three that already exist. The steps generalize to any new group:
- From Asset Management > Asset Groups, click + Add.
- In Name, type a unique, descriptive name — this is what admins and users see when assigning or browsing assets, so favor clarity (
Windows Servers, notWS-01). - In Code Name, type an integration-friendly identifier, e.g.
ag-windowservers. Leave it blank to auto-generate one. - In Comments, describe the group's purpose — this shows in the list view and helps other admins understand scope at a glance.
- Click Save (Add). The group now appears in the list and is immediately available as a target when creating or editing an Asset.
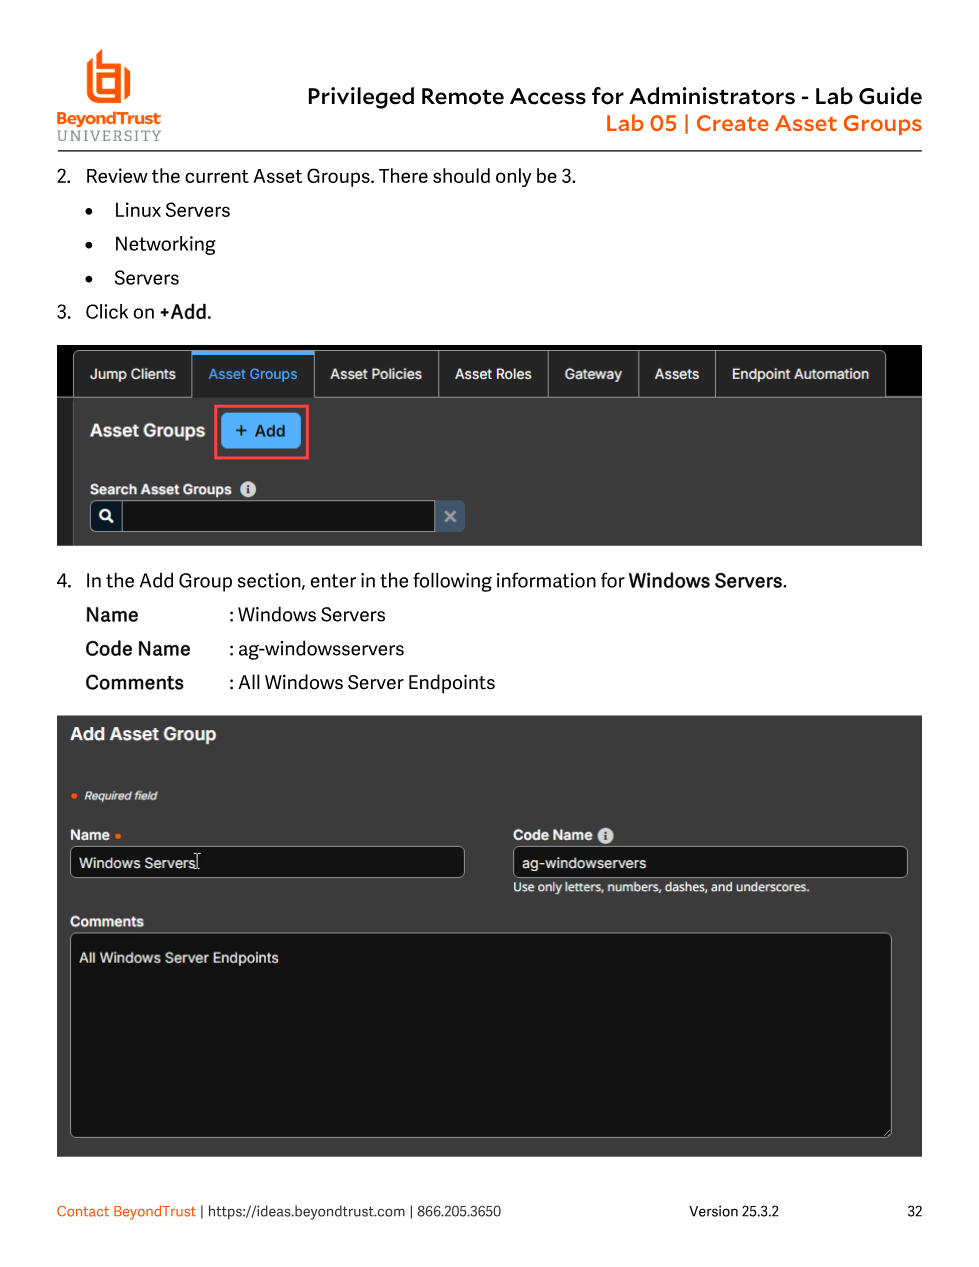
Windows Servers), Code Name (ag-windowservers), and Comments (All Windows Server Endpoints).Organizing existing Assets into groups
Creating the group is half the job — assets also have to be moved into it. In the Access Console's Assets tab, the left-hand tree lists every Asset Group the logged-in user has visibility into (under My Asset Groups). Selecting an empty group like Windows Servers shows "No Assets belong to Windows Servers" until something is reassigned to it.
To move an asset, select it, open its Properties, and change the Asset Group dropdown — the same properties dialog also exposes Asset Policy and Session Policy fields, which is a useful reminder that group, policy, and role assignment are all edited from the same place per-asset. Lab 06 walks through exactly this: moving DC01 - Remote RDP out of the generic Servers group and into Windows Servers, then confirming it now appears under the new group in the tree.
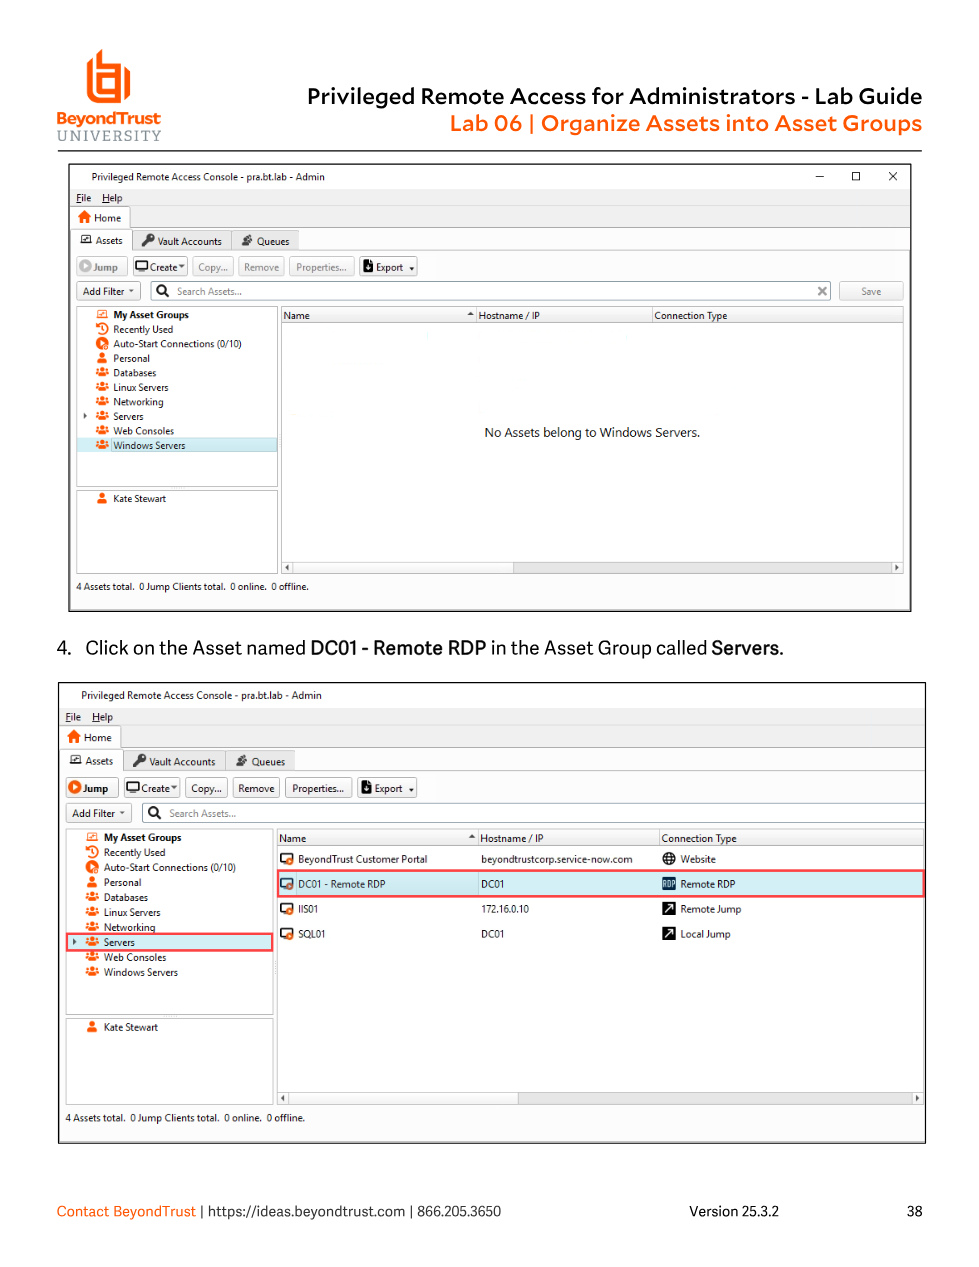
Windows Servers is empty, and DC01 - Remote RDP still sits in the generic Servers group.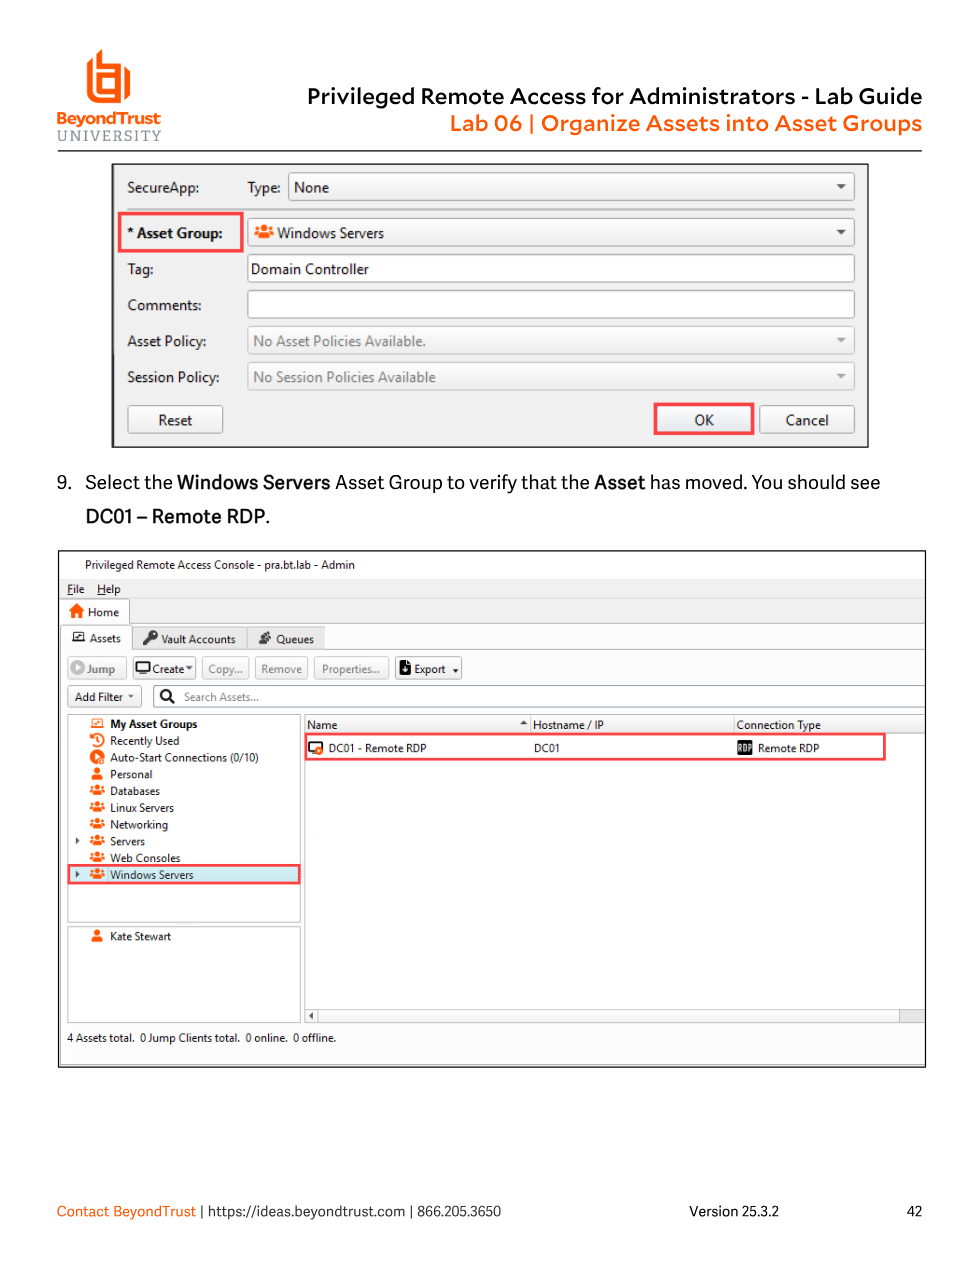
Windows Servers, DC01 - Remote RDP shows up under the new group.Deleting an Asset Group
Once every asset has been reassigned out of a now-redundant group (in Lab 07, the original catch-all Servers group), it can be deleted from the same Asset Groups list using the trash-can icon. The confirmation dialog is explicit about the blast radius: "WARNING: All Assets and Asset installers deployed within this group will be removed. You may wish to move them to another Asset Group before performing this operation. Asset events for Assets using this Asset Group will only be viewable by users granted the View Reports permission on their System Asset Role setting."
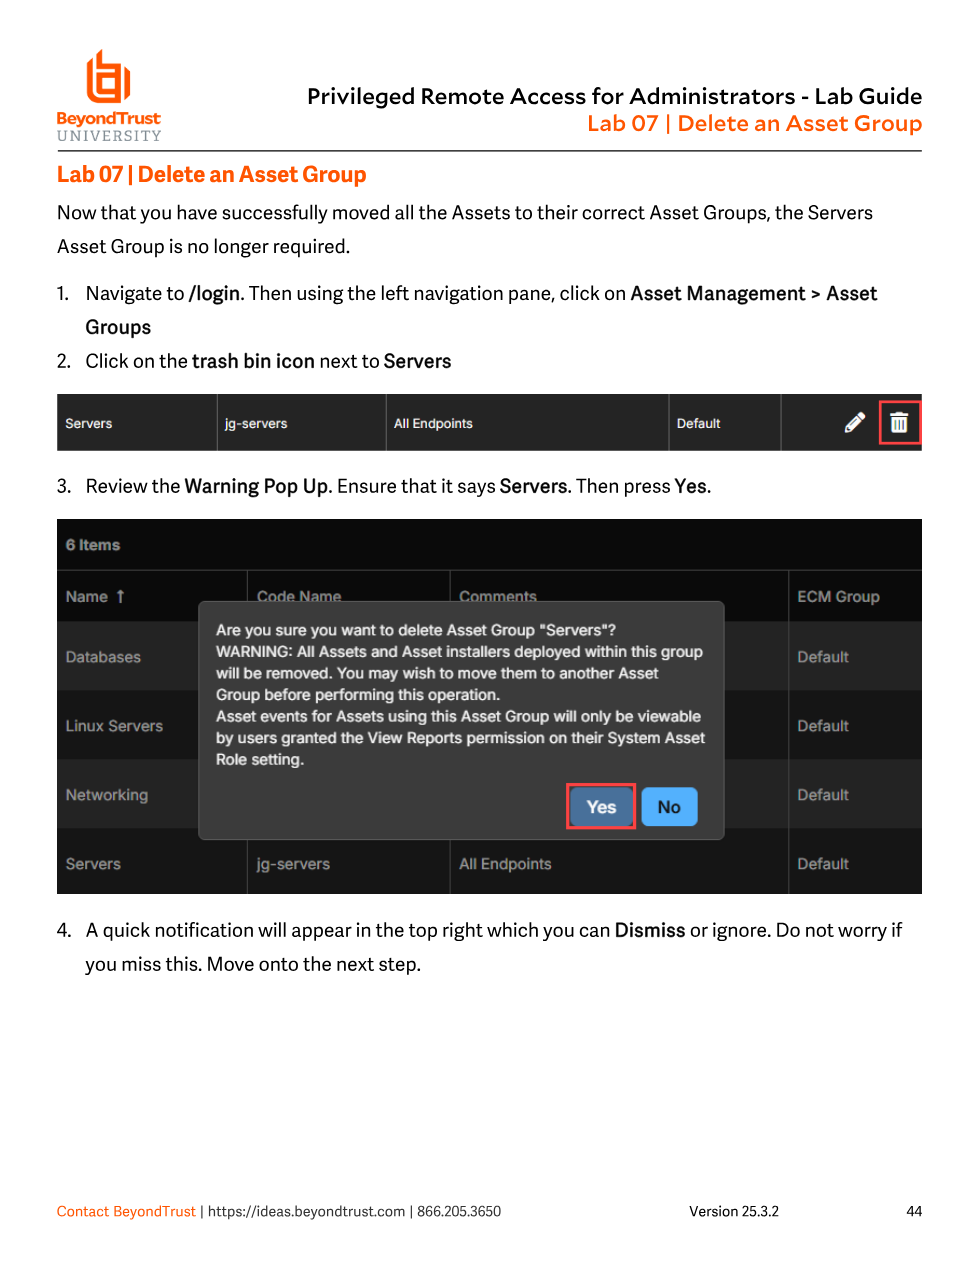
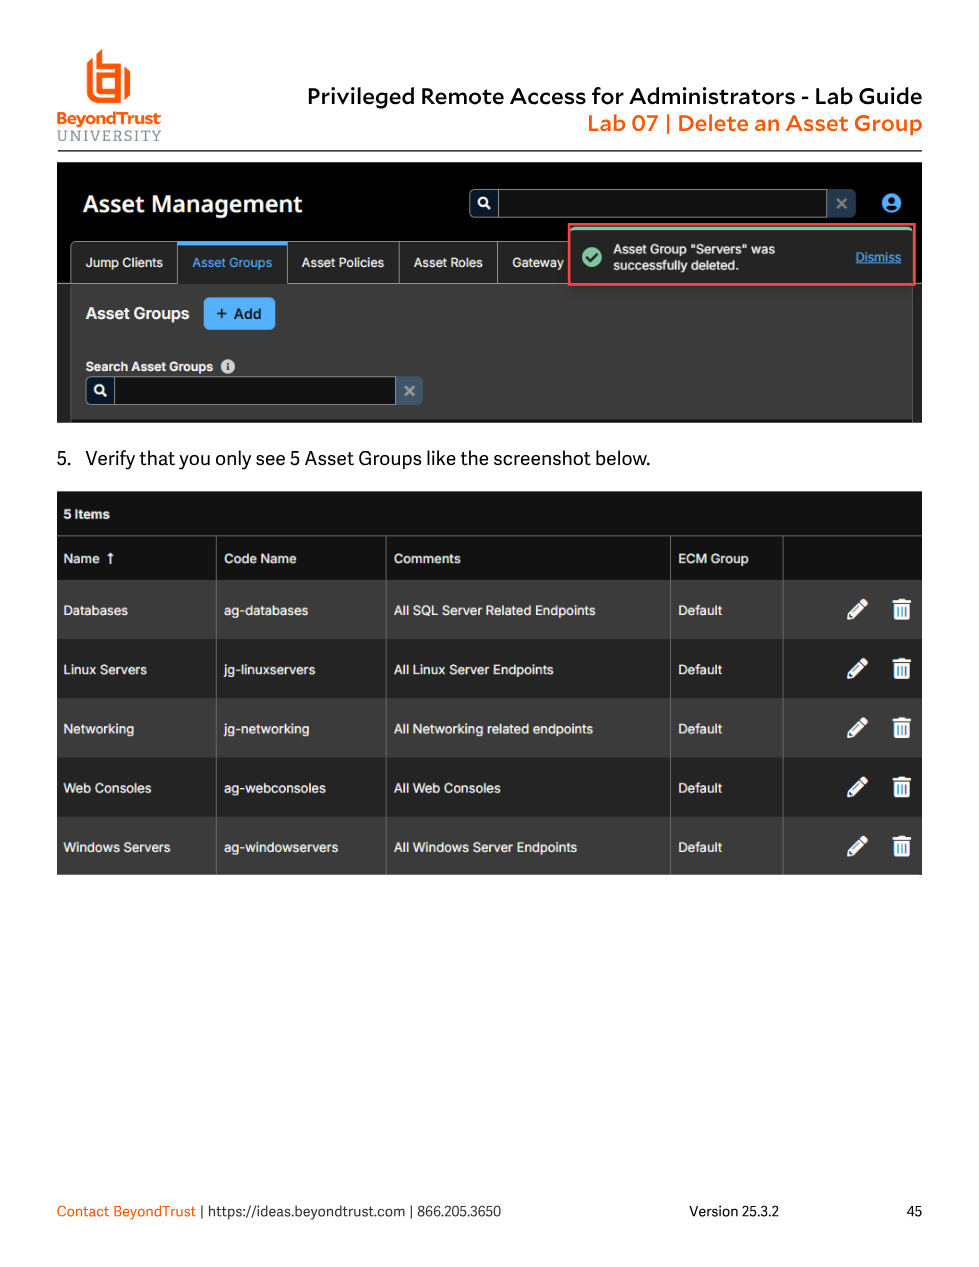
Deleting an Asset Group does not offer to relocate its members for you — it deletes the assets and installers left inside it. Admins who treat group deletion like folder deletion in a file system (expecting contents to just become "unfiled") lose Jump Clients and asset installers outright. Always audit and move every asset out of a group first, exactly as Lab 06 does before Lab 07 deletes the now-empty Servers group.
Design guidance for real environments
- Group by access boundary, not by convenience. If two sets of systems should never share an approver or a role, they belong in different Asset Groups — grouping by OS or function (as in the lab) is a reasonable starting heuristic, but the real driver should be "who needs access to this."
- Keep names and code names meaningful. Code names surface in API/integration contexts (e.g.
ag-databases); pick a consistent naming convention early, since renaming later doesn't relabel anything referencing the code name in external tooling. - Assign at the Group Policy level where possible. Individually adding users to an Asset Group works for exceptions, but bulk access should flow through Users & Security > Group Policies so that onboarding/offboarding a user's group membership automatically grants or revokes their Asset Group visibility.
- Remember Asset Groups are necessary but not sufficient. They gate visibility only — the next two modules layer on when access is allowed (Asset Policies) and what a user can do once connected (Asset Roles).